Adding your Availability and Pricing to your ChaletFinder advert is not only easy but it is really important! Without any pricing, no ‘from’ price will show up on the front of your advert. This creates what is known as a ‘barrier to sale’. You are essentially asking the site user to ask you a question. Many people don’t want to engage at this early stage and like to narrow down their options before making contact. You may think it would force someone to contact you but in most cases it will make them move on to the next result. In addition to this, not having your date ranges on the adverts can affect the search results. If a site user enters in their holiday dates in the secondary search and you have nothing entered then your advert will not be returned in the search results. Keeping on top of your availability is also very beneficial as people love to have all the information at their finger tips… in some cases enquirers can become frustrated if they take the time to contact you or us and the dates they want are actually sold.
We do have an integration with Chalet Manager, so check out our blog which will give you a step by step guide on setting up the integration.
The following steps will details how to add your availability and pricing:
- Log into your account via the advertiser log in and you’re ready to begin!
- Click ‘Edit’ to the left of the chalet you wish to edit
- On the menu bar to the left you will see an option saying Availability & Pricing, open up this menu
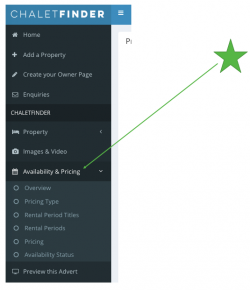
Working through the menu as follows will ensure you fill in your availability and pricing completely. There is a red warning box which shows up on the top right of the pages to alert you if anything is missing. It is possible to close this down by pressing the X in the top right hand corner, though it will still show on the pages until all your Availability and Pricing is complete.
- Overview – Here you can add any additional information regarding your pricing, availability or even payment terms. When you have filled this in make sure you press the blue button on the bottom left, ‘Save Availability Notes’. At the top of this page you’ll see a heading that reads; “Your property prices are expressed in ______ – to change currency click here“. This is where you’ll be able to alter the currency that your advert is priced in. This is an optional page but it is always worth giving your potential customer as much information as possible up front to help them make their decision.
- Pricing Type – If you only let your property in one way, for example, sole occupancy then fill this option in. If you use this option make sure you press ‘Add Pricing Type’ on the bottom left of the screen. You can then click next to take you onto the next screen.
- Rental Period Titles – This page allows you to set multiple pricing types for example, Self catered, Catered, Sole Occupancy Catered, Per person per night etc. This page allows you to offer flexibility to your guests.
- Ensure you click ‘Add Rental Period Title’ after each title is entered.
- It is possible to change the title of the rental period by clicking to the right hand side of the Added Rental Period on ‘Change Period Title’ highlighted in blue
- Warning: If you check the box to the left of the rental period title and click delete it will also delete any prices which may have been added
- When you have added your Rental Period Titles click ‘Next’ to move on
- Rental Periods – This page allows you to set the date parameters of your rental.
- You can add rental periods in 3 ways. If your property will have the same change over day every week from the start to the end of the season then simply choose the start date where it says ‘Period Start Date’ and then add the ‘Period End Date’. When you are sure these dates are correct, click ‘Add Rental Periods’ in the green box to the right of the dates entered. This will list your dates with the same changeover day for the duration of the dates you have entered.
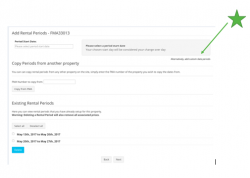
It is possible to add a custom set of dates which may be necessary if you wish to offer short breaks at some point in the season or if Christmas or New Year fall on a weekend. On the right hand side of the screen, just below the grey box entitled ‘Please select a period start date’ you will see a sentence saying ‘Alternatively, add custom date periods’. Click here and enter your individual start and end dates. Do not forget to click ‘Add Rental Periods’ EACH TIME.
-
- If you have a property already advertised which will be running on the same date parameters it is possible to copy this across from that property by using the property FMA number. If you find the area which says ‘Copy periods from another property’ and add in the FMA number of the property you wish to copy FROM, then click ‘Copy from FMA’.
- When you have finished adding your Rental Periods then click ‘Next’.
- Pricing – On the ‘Update Pricing Information’ page you will see the Rental Period Titles and Rental Periods you have just set. You can now manually add in your pricing. Alternatively, you can copy and paste from a spread sheet column and the prices will automatically go in the column vertically. Ensure you press ‘Update Prices’ before pressing ‘Next’ or your pricing will not be saved.
- Availability Status – This is the final page which will allow you to set each weeks status to Available, Fully booked or Some Availability. Again, do not forget to press ‘Update Availability’ at this stage or your hard work will not be saved!
If you have any problems then please do get in touch with us on office@chaletfinder.co.uk or give us a call on +44 7585 861023


Comments are closed here.